How to Do Bhujapidasana
Proper Form, Variations, and Common Mistakes
:max_bytes(150000):strip_icc()/Sara-Lindberg-660-388192bccc764ffd84e5a8c1abf66ca8.jpg)
:max_bytes(150000):strip_icc()/Sara-Clark-1000-9a1cd5a63c214af68fbb8561a2369e3b.jpg)
Sara Clark is an EYT 500-hour certified Vinyasa yoga and mindfulness teacher, lululemon Global Yoga Ambassador, model, and writer.
Also Known As: Shoulder-pressing pose, arm pressure pose
Targets: Hands, wrists, elbows, arms, shoulders, upper back, hips, and core
Equipment Needed: Yoga mat and blocks (optional)
Level: Intermediate/Advanced
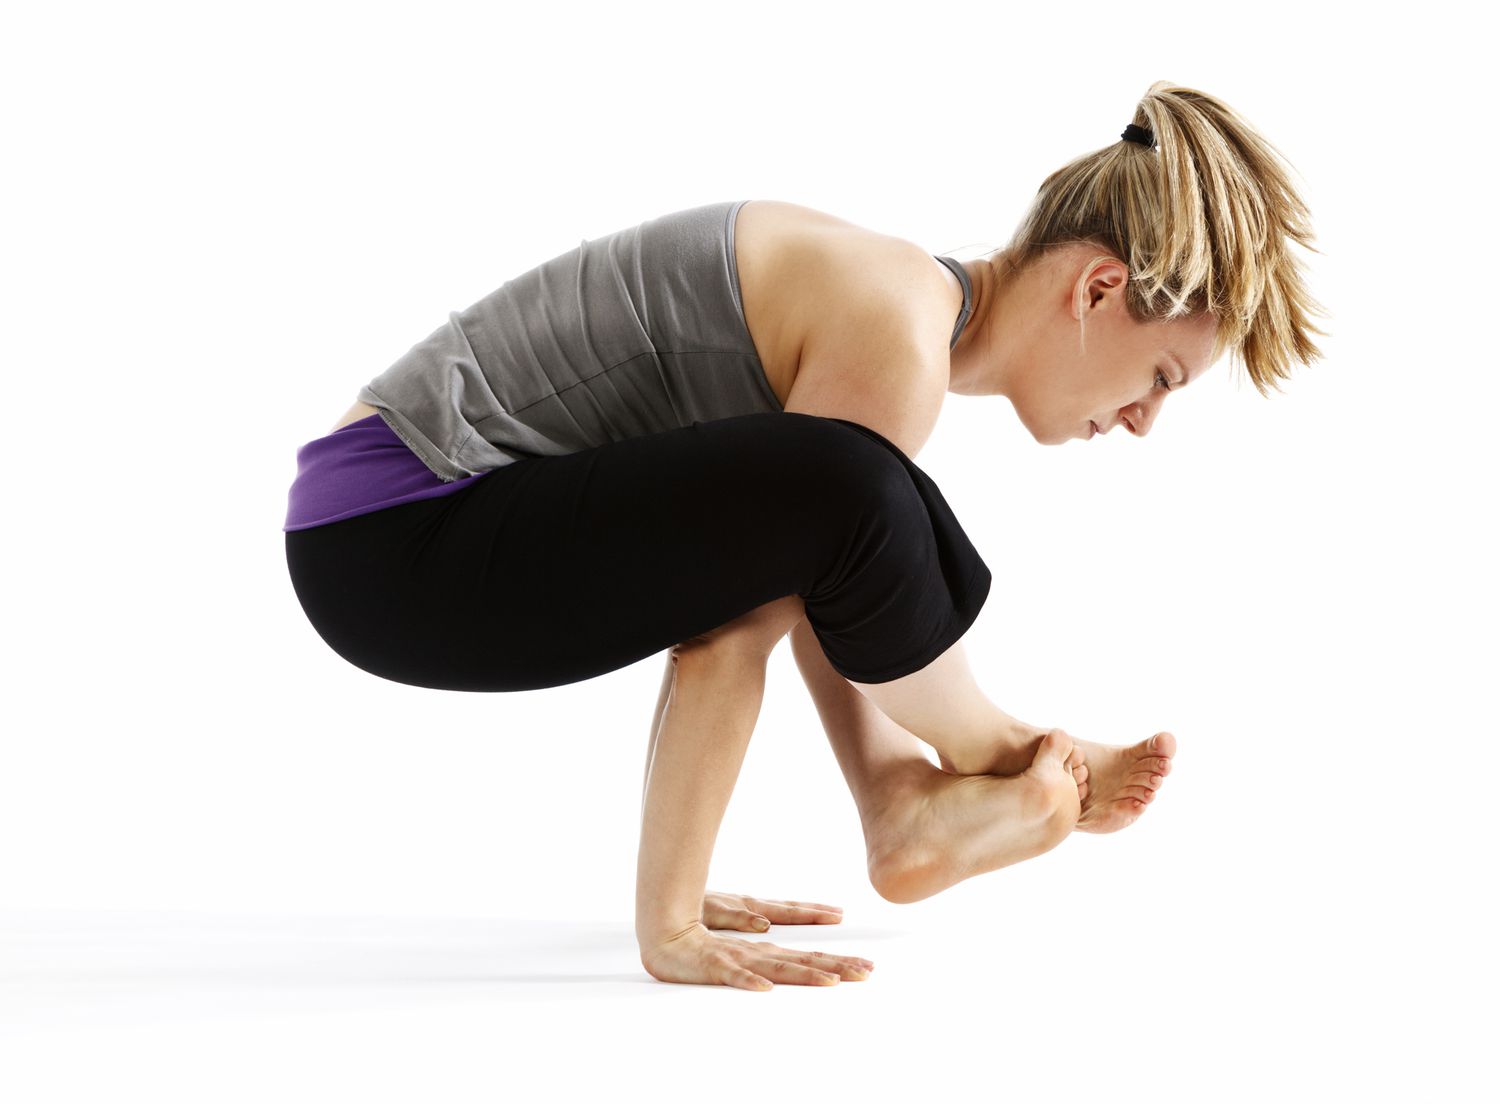
Bhujapidasana, also known as the arm-pressure or shoulder-pressing pose, is an intermediate-to-advanced level move in yoga. The name of the pose comes from three different meanings: Bhuja, which means arm/shoulder, Pida, which means pressure, and Asana, which means pose.
Practicing Bhujapidasana can build strength in your arms, shoulders, wrists, hands, core, and inner thighs. It also helps improve your balance and increases the flexibility in the hip joints. Bhujapidasana is one of the essential core poses you should add to yoga line-up or perform on its own once your muscles are warm. Bhujapidasana is often introduced before trying the more advanced Tittibhasana, or Firefly Pose.
Benefits
The Bhujapidasana pose challenges both your strength and balance. This pose is the first in a series that requires you to support your whole body with your arms and hands. When done correctly, you can build strength in your wrists, hands, arms, chest, shoulders, and upper back. It also builds core strength and opens the hips and pelvis. To perform safely, you need to have flexibility in your hip flexors and hamstrings. As flexibility increases, you will be able to stay in the pose longer.
You will gain the most benefits from the Bhujapidasana by staying in the position for long holds while practicing deep breathing. This allows you to focus on balance and stability while also improving strength and stamina in the upper body and hands. Through slow, mindful breathing, you can gradually increase the time you stay in this pose.
Step-by-Step Instructions
- Get in a low squat position with your feet slightly less than shoulder-width apart. Keep your knees wide.
- Perform a forward fold until your torso is between your inner thighs. Hands will be inside your feet and elbows touching the inside of your knees. Your weight will be forward.
- Snuggle your shoulders underneath the thighs placing your hands flat on the ground on the outsides of your feet. Heels of hands should align with the heels of the feet.
- Press your upper left arm and shoulder onto the left thigh above the knee. The left hand should be flat on the floor.
- Press your upper right arm and shoulder onto the right thigh above the knee. The right hand should be flat on the floor.
- Once you get to this point, engage the upper arms, pressing the shoulders into the upper thighs, upper thighs pressing into the arms and squeeze the knees in towards the shoulders. You should now feel your upper back begin to round.
- Place the weight in your hands, lean back, and lift your feet up off the floor. For an extra challenge, cross at the ankles.
- Stay here and breathe deeply for 30 seconds, or as long as comfortable. When you’re ready to return to the starting position, bend your elbows and release your feet back to the floor.
Common Mistakes
With a pose like Bhujapidasana, it's important to watch out for potential mistakes that could lead to injury.
Not Warmed Up
The Bhujapidasana pose requires a lot of flexibility in your hips and hamstrings. To do this move safely, your body must be warmed up.
Lack of Flexibility or Strength in Hands, Wrists, and Upper Body
If you’re new to this pose or you have limitations in the wrists, shoulders, or elbows, do not force your body into this position. You may need to do a few preparatory poses to work your way up to an arm or shoulder-pressing pose. Building strength and flexibility in your core and upper body are key to performing this move correctly.
Arms Sliding Off Legs
To keep your upper body stable, make sure your elbows are bent at 90 degrees and pointing back. This can prevent your arms from sliding off your legs.
Not Distributing Weight Evenly
This pose requires a tremendous amount of hand, wrist, and upper body strength. To lift your feet off the floor, you need to evenly distribute your weight in both hands. Some people have a tendency to favor one side, which causes you to be off-balance. It also places more pressure on that hand, elbow, and shoulder. Engage mula bandha for an added lift drawing the navel towards the spine while lifting it lightly to engage the core.
Moving Too Quickly
Bhujapidasana, like many other yoga poses, requires patience, time, and practice. Unless you are an intermediate-to-advanced level yogi, do not force yourself into this position. Take some time to do easier poses that build strength and flexibility. And when you’re ready, do each step slowly.
Modifications and Variations
Bhujapidasana is an essential pose in most yoga sequences. With that in mind, there are ways to make it easier and more challenging.
Need a Modification?
Start with a simpler arm balance pose. Bhujapidasana is a challenging pose. Many people will need to start in a simpler pose and work their way up to this move. To build strength and increase flexibility, consider trying Bakasana or crow pose. You can also try Parsva Bakasana or side crow pose.
If you cannot flatten your hands when first beginning this pose, try placing yoga blocks under your hands. As you gain strength and flexibility in your hands and wrists, you can remove the blocks and place your hands flat on the floor.
Up for a Challenge?
If you’ve mastered the basic steps in this pose, it’s time to cross at the ankles. You can add this step before you lift your feet up off the floor. Experiment crossing both ways.
Once you master Bhujapidasana, you can try more challenging poses that require similar strength and flexibility. One move in particular is a logical next step after performing this arm pressure pose. Tittibhasana or firefly pose takes what you learned with Bhujapidasana and has you straighten your legs out in front of you. This is an advanced move, so make sure your upper body strength is adequate and you have the flexibility in your hips and hamstrings.
Safety and Precautions
Bhujapidasana pose is generally safe for most fitness levels. However, if you feel discomfort or pain in your wrists, stop. You may not have the proper flexibility in your wrists to perform this move.
Additionally, if you have issues with your shoulders, elbows, or lower back, make sure to pay attention and address any discomfort or limited range of motion when performing this pose. If you feel any pain, stop and consider one of the modifications. You should always ease into this pose and avoid forcing the position. It is normal for this pose to be difficult at the beginning, but you should never feel pain.
Also, if you are pregnant, you should avoid this pose, unless your doctor grants permission. Anyone with high blood pressure should also get clearance from their physician before performing the Bhujapidasana pose.
Try It Out
Incorporate this move and similar ones into one of these popular workouts:
:max_bytes(150000):strip_icc()/Sara-Lindberg-660-388192bccc764ffd84e5a8c1abf66ca8.jpg)
By Sara Lindberg
Sara Lindberg, M.Ed., is a freelance writer focusing on health, fitness, nutrition, parenting, and mental health.
:max_bytes(150000):strip_icc()/GettyImages-1388074143-95b225588e4b498e8275b908c7b3e18a.jpg)
:max_bytes(150000):strip_icc()/About-A65-Plank-819-63154cee20c14a0598f97ad86d0f27a6.jpg)
:max_bytes(150000):strip_icc()/Web_1500-Verywell-42-3498282-Pushup02-1603-e7fac17c5bd441d78f8f2891369de879.jpeg)
:max_bytes(150000):strip_icc()/16-PeacockPose-007-4525b9aa09504275ac391f9ec619333d.jpg)
:max_bytes(150000):strip_icc()/womanperformingbasicbridestretch-cdabd9e7aebc49b1b9a15655054f109e.jpg)
:max_bytes(150000):strip_icc()/16-PeacockPose-007-f4fc7e85cb304ff8bf3bdaac9398aff8.jpg)
:max_bytes(150000):strip_icc()/ardhachandrasana-56aa40e25f9b58b7d0033f18.jpg)
:max_bytes(150000):strip_icc()/38-3567117-SideCrowPose-003-ff2ef76f971147fea831c6c649767089.jpg)
:max_bytes(150000):strip_icc()/GettyImages-666305652-ad76be82b2e9405b957851333cb39cf0.jpeg)
:max_bytes(150000):strip_icc()/CrocodilePoseMakarasana-07e89957ca74463cb9e5b593a3aed149.jpg)
:max_bytes(150000):strip_icc()/37-3567070-Crow-Pose-GIF-35cb4f184e2846609541350fb38569d5.jpg)
:max_bytes(150000):strip_icc()/downward-dogcopy2-59946696054ad9001109953f.jpg)
:max_bytes(150000):strip_icc()/sunsalutationchaturanga_lowplankpose-5c5c94ba46e0fb0001dccf97.jpg)
:max_bytes(150000):strip_icc()/FlyingCrowPose_annotated-e205e878973b4a8480351eb1c34e92f5.jpg)
:max_bytes(150000):strip_icc()/extendedhandsandknees_birddogs-5c54994d46e0fb0001be65a0.jpg)
:max_bytes(150000):strip_icc()/About-50-4111744-Tree-Pose02-641-5c4b762cc9e77c00016f33b6.jpg)