How to Do Half Squats: Proper Form, Variations, and Common Mistakes
:max_bytes(150000):strip_icc()/Rachel_MacPherson_Contributer1-8f6faa1ddb5a4374956d56a1734d6857.jpg)
Rachel MacPherson is a health writer, certified personal trainer, certified strength and conditioning specialist, and exercise nutrition coach based in Halifax.
:max_bytes(150000):strip_icc()/Tara-Laferrara_1000-1b0c542e92414d0daf82155c2af35e52.JPG)
Targets: Quadriceps, hamstrings, glutes, hip flexors, calves, core muscles
Equipment Needed: Barbell (optional)
Level: Beginner
Squats are a common addition to many fitness routines, whether they're performed using just bodyweight or with weight added. Expanding the styles of squat you practice provides extra options, as well as physical benefits.
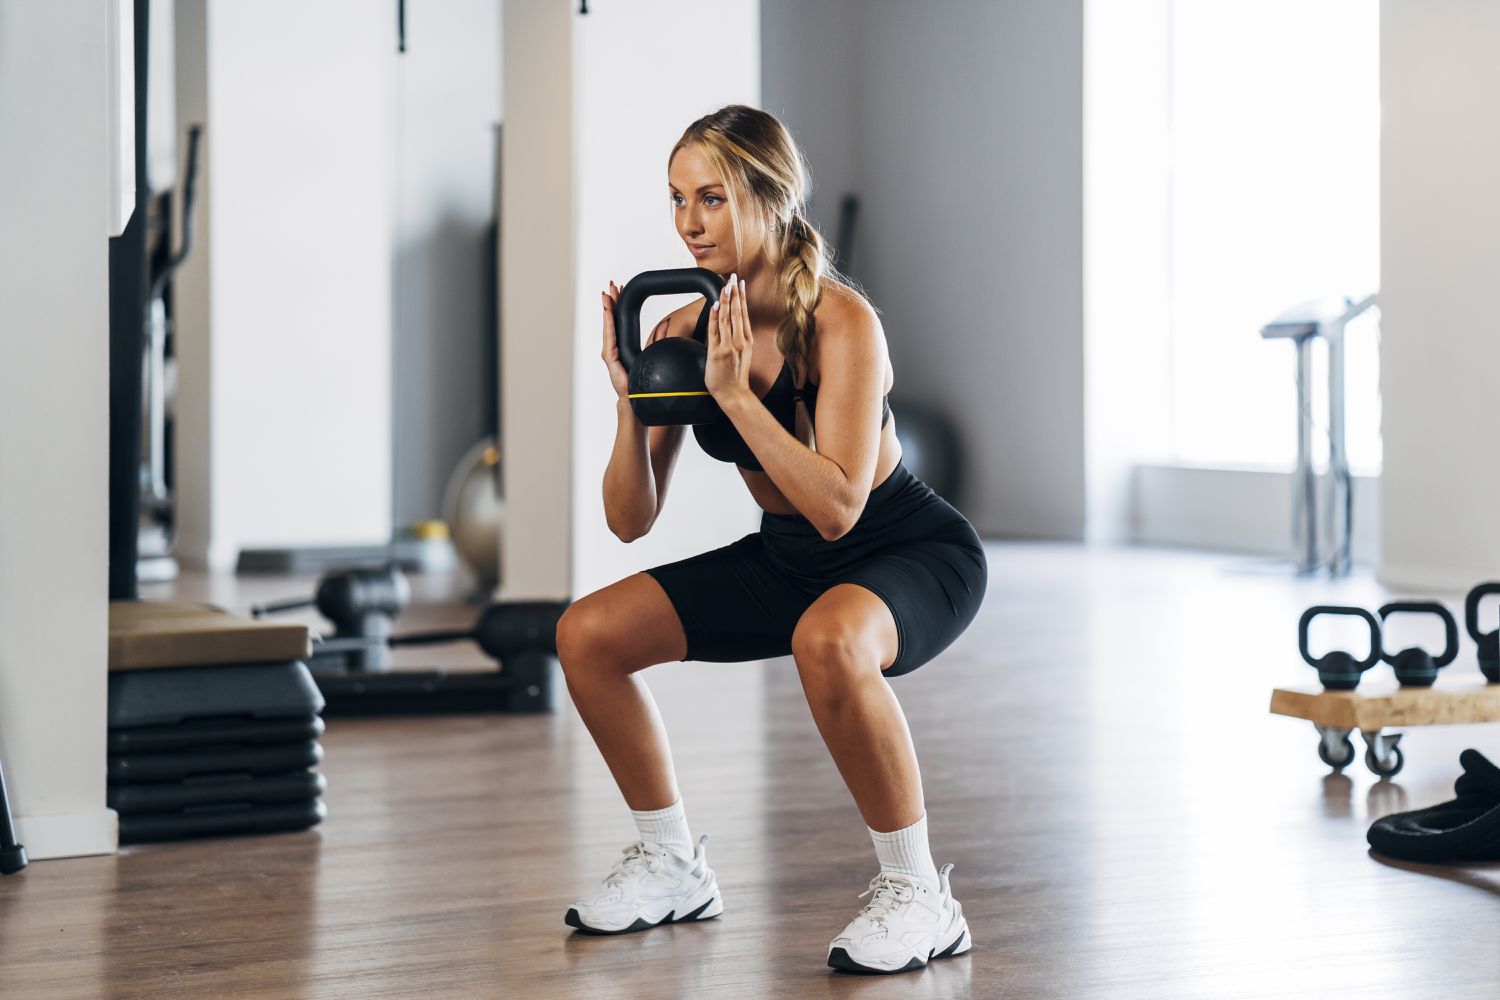
A style of squat you may want to consider adding to your rotation is half squats. These squats require you to lower your body down so that your thighs are parallel to the floor (this is also known as squatting "to parallel"). While the name may point to a lesser exercise, half squats have a legitimate place in any strength training program.
Half squats are a great option for all individuals, no matter how deep your natural squat is. What’s more, the depth of your squat ability is primarily based on your anatomy, which is out of your control. Other factors, like mobility and range of motion, come into play as well, which are areas you can work on to increase the depth of your squat if desired.
Half squats get a bad rap among those who believe the deeper the squat, the better, but this is not feasible for many people. Half squats are beneficial if you are working on overcoming a strength plateau or you are in the process of increasing your mobility and range of motion.
How to Do Half Squats
While the ideal width, foot position, and barbell position can differ for each person, there are general cues that most people can start from when performing squats. If you want to work on your sticking point, in particular, to push past a plateau, you can add a pause at the bottom of the half squat before returning to standing.
Follow these directions for performing half squats. If you need to make adjustments based on your anatomy or are unsure about your form, seek guidance from a personal trainer or another exercise specialist.
- Place your feet about shoulder-width apart, pointing ahead with a slight angle outward (about 5 to 7 degrees for most people during a bodyweight squat, a bit more for a barbell squat).
- Create an arch in your foot, pressing down with your heel, the base of your first toe, and the base of your 5th toe to create a sort of tripod—this will provide stability and even distribution of your weight.
- Drive your hips back into a hip hinge, bringing your chest forward, engaging your glutes and hamstrings.
- Squeeze your glutes and drive your knees out to create tension and external rotation in your hips. You should feel your outer hips engage—this helps you safely maintain form, protecting your knees and back as you descend into the squat further. Be sure to keep the arch in your feet with all three points still touching the ground.
- Keep your neck and torso in an upright, neutral position. Look ahead and at a slight angle downward.
- Descend to the desired position, either to parallel or just above, keeping balanced with your weight evenly distributed in your feet. For a half squat, your shins should be as vertical as possible.
- Drive your hips up and back, pulling in your shins to vertical as you return to standing (the ascent).
Benefits of Half Squats
Learning to squat below parallel has advantages, such as increasing active knee stability and reducing sports injury risk to the knee—but only if performed correctly; otherwise, injury can result. Working on half squats while consistently training to increase your range of motion is wise if you cannot squat below parallel while maintaining proper form.
Performing half squats intentionally also can help you push past strength plateaus. If you have what’s known as a “sticking point” in your squat technique, where it is much more difficult during the top phase of the squat, training half squats can help increase your strength in that area, pushing you past your plateau.
Half squats are also a vital element of the push press exercise. If you want to improve that particular lift, working on your half-squat power and technique is beneficial. For this purpose, use an explosive motion when you reach the bottom of the half squat to return to the starting position.
Other Variations
Your individual ability to squat is highly dependant on your anatomy. The hip joint is a ball-and-socket joint that can move in all three planes of direction.
People with shallow hip sockets can go much deeper, as there is no bone in the way to stop the ball joint of the hip from rotating so far as to allow this much movement. Fortunately, you can perform this exercise in different ways to meet your skill level and goals. Here are some options.
Modification
If you have deep hip sockets, you will be limited in how far you can lower yourself. But, it’s possible to work on your mobility to increase the depth of your squat to your natural ability.
Start by doing a bodyweight half squat, which is also called an air squat. With no weights and your arms out in for balance, perform a half squat.
You can even put a chair or box behind you and then just sit down and stand up. This box squat variation is the best way to improve your squat. You can gradually lower the box to increase your depth in your squat as well. As you get more comfortable, you can add dumbbells at your side and eventually add the barbell.
For a Challenge
If you find that a half squat is not challenging enough for you, you can try to do a full squat. Full squats are typically considered those which have the squatter's bottom as close to the ground as possible. Also commonly called “ass to grass” squats, some people believe this is the only proper way to squat.
Essentially, you start with a half squat but continue to descend to the desired position, staying balanced with your weight evenly distributed in your feet. Once you have reached the bottom of your movement, the angles of your knee joint and hip joint are nearly equal.
You should not drop or bounce into the bottom position. Instead, maintain slow and controlled muscle tension. As you return to the starting position, keep your torso and back erect and your hips under the bar.
Common Mistakes
When performing half squats, don’t crane the neck up or bend it too far forward. Keep your chest up and forward, not allowing it to collapse or hunching your back. Also, looking up or down can put your neck in an unsafe position.
You also should pay particular attention to your posture. Keep your back straight and in a neutral spine position, rather than rounded or overly arched. Also, keep your knees in line with your toes rather than angled out too far, and don't allow your knees to extend beyond your toes.
Overall, half squats will work your quadriceps, hamstrings, glutes, hip flexors, calves, and core muscles, including those in your lower back. But, if you don’t go to parallel, you will place much less emphasis on your glutes and hamstrings than you would during a deeper squat. Don’t neglect training for a deeper, more full squat within your anatomical capabilities.
Deeper squats will strengthen more muscles including your glutes, rectus femoris (part of your quads), hamstrings, and adductors, and increases your mobility. It can also help build the supporting musculature around your knees, preventing injuries if you go deeper.
Safety and Precautions
Performing any type of squat with poor form is a potential injury risk, especially when you add weight. Seek the guidance of a personal trainer or other exercise specialists for form corrections if you are concerned or need help getting started. If you are performing weighted, heavy squats, it is wise to have a spotter available and to use a rack that has safety bars in place in case you need to drop the weight.
You also should talk to a healthcare provider if you have had an injury or condition involving your ankles, knees, legs, hips, or back to see if this exercise is appropriate for you. This exercise can put a strain on your knees, even if you have no history of issues. Also, pay attention to your stance. A narrow stance will put more stress on your knees as well.
Try It Out
Incorporate this move and similar ones into one of these popular workouts:
Myer GD, Kushner AM, Brent JL, et al. The back squat: A proposed assessment of functional deficits and technical factors that limit performance. Strength Cond J. 2014;36(6):4-27. doi:10.1519/SSC.0000000000000103
Endo Y, Miura M, Sakamoto M. The relationship between the deep squat movement and the hip, knee and ankle range of motion and muscle strength. J Phys Ther Sci. 2020;32(6):391-394. doi:10.1589/jpts.32.391
Kubo K, Ikebukuro T, Yata H. Effects of squat training with different depths on lower limb muscle volumes. Eur J Appl Physiol. 2019;119(9):1933-1942. doi:10.1007/s00421-019-04181-y
:max_bytes(150000):strip_icc()/Rachel_MacPherson_Contributer1-8f6faa1ddb5a4374956d56a1734d6857.jpg)
By Rachel MacPherson, BA, CPT
Rachel MacPherson is a health writer, certified personal trainer, and exercise nutrition coach based in Halifax.
:max_bytes(150000):strip_icc()/About-146-3120740-Reverse-Plank01-14171-c487fccc71f848e390a7a36a2aeb02b6.jpg)
:max_bytes(150000):strip_icc()/GettyImages-622918790-7486995d42e446dfb2cc44df3cc8b8c3.jpeg)
:max_bytes(150000):strip_icc()/GettyImages-1205075426-21e346fb31594e0ab248a5fedf04f48a.jpg)
:max_bytes(150000):strip_icc()/asianwomandeadlifts-58bd77e63df78c353c33fd08.jpg)
:max_bytes(150000):strip_icc()/GettyImages-1346900970-f1c941085f8a422aa833796b4aa8afe5.jpeg)
:max_bytes(150000):strip_icc()/About-5-1231273-Squat-Jumps01-0841-4faa02d15815454baadb7e37bceed016.jpg)
:max_bytes(150000):strip_icc()/Squat_annotated-35163d5f572948bd892f4e4628571f41.jpg)
:max_bytes(150000):strip_icc()/GettyImages-537762241-9584a9d6bcc44108adaa2acd5d9a9886.jpeg)
:max_bytes(150000):strip_icc()/Verywell-32-3498277-PlankUprightRow03-1421-3cd7324344a34038bc2b452c77ee1cc0.jpg)
:max_bytes(150000):strip_icc()/Web_1500-About-213-1231317-Pulsing-Squats-OHP05-1785-ec4fdc05f68b4f5e992aabe1e9951dab.jpeg)
:max_bytes(150000):strip_icc()/FroggyJumps_annotated-3758f60249ce41e09612a4de1d068028.jpg)
:max_bytes(150000):strip_icc()/GettyImages-1312601106-c3c8e01c5199430889c2060b94c839d7.jpg)
:max_bytes(150000):strip_icc()/loading-barbell-cc44ac1c9fff4c0d8225d76846b02f0a.jpeg)
:max_bytes(150000):strip_icc()/Web_1500-About-20-3119147-Single-Leg-Squat02-321-8974ef6f7ea24b3c96261ee8df422abd.jpeg)
:max_bytes(150000):strip_icc()/GettyImages-1317878253-b60abfa94670422aa24ff447fb226086.jpg)